POWERFUL PLANOGRAMS WITH FLOOR PLANNING
FEATURE-PACKED PLANOGRAM SOFTWARE
PROFESSIONAL PLANOGRAMS IN MINUTES
COMING SOON
CHANGE AND VIEW PLANOGRAMS ON THE GO
VIEW PLANOGRAMS ON THE GO
RESIZE PHOTOS WITH QUICK AND EASE
PRODUCTS
SERVICES
COMPANY
RESOURCES
FREE TRIAL

KNOWLEDGE BASE
Moving Shelf Logic to Another Computer
This tells you how to move the shelf logic program and user license to another computer.
You are able to move the shelf logic program and user license to another computer, or to the same computer if you are upgrading to another operating system.
Moving to a different computer:
1. Backup your shelf logic database and plan files. These are typically found in the datafile folder (found under the shelf logic program folder).
2. Before uninstalling the program, you will need to run a program that will remove the program key. This program is called "move.exe" and it's found in the program folder (which is c:\program files\shelf logic enterprise edition" for the enterprise edition version, c:\program files\shelf logic master edition" for the master edition version and "c:\shelflogic_pe" for the pro version.)
When you run the move program, you will be given a "remove code." Write this code down. You will need to give us this remove code in order to verify you have removed the program key.
3. Uninstall the program using the normal method of using the add or remove programs from the windows control panel.
4. Install the shelf logic program onto the new computer.
5. Call us for a program key for the new computer. have your remove code handy.
Upgrading your operating system:
Upgrading your operating system may destroy your user license program key so follow this procedure before doing the upgrade.
1. Backup your shelf logic database and plan files. These are typically found in the datafile folder (found under the shelf logic program folder).
2. Before upgrading your operating system, you will need to run the move.exe program that will remove the program key.
3. Perform the upgrade.
4. If your upgrade destroys the program, then you will need to download and reinstall the program. (Links are below)
5. Call us for a program key for the new computer. Have your remove code handy.
Creating a Product Database
This gives you details about importing your database, as well as taking and processing your own digital product photos.
Creating a planogram database is perhaps the most difficult part of creating planograms. Once your database is finished, however, it can be maintained with little effort and can provide you with many planograms for years to come.
There are two choices when it comes to creating your product database. You can purchase the information or create it yourself. This manual is for those who desire to create their own product database. You can get very professional results from doing it yourself. If you wish to purchase product data and images, there is a list of suppliers at the end of this document.
Shelf Logic needs only a minimum amount of information in order to create planograms. You'll need the product's UPC code, and the product's width, height and depth. If you have a photo of the product, it can be used to show the product as it will actually look.
If you already have the product dimensions in another database or file format, you can probably get that information into Shelf Logic. If your database is ODBC compatible or you can put the information into excel, you can import it into the shelf logic database. Proceed to section 2 to learn more about this.
If you don't have the information, you just use a ruler to measure the product and a digital camera to take pictures of the product.
Section 1. Creating a Product Database
UPC Code
You will need the UPC code of each item in the database. If you don't have a UPC code, you can create a fake one, up to 25 characters in length. International items, for example, often don't have UPC codes.
Each UPC code, real or fake, must be unique. If you attempt to add an item already existing with the same UPC code, you will be alerted.
The UPC code identifies the product in the shelf logic database and must be entered.
Product Dimensions
The product width and height are essential. Without them, the product appears as a dot on the Shelf Logic plan. The depth should be entered, but you can create planograms without the depth. It's used for calculating and reporting the quantity of the item on the plan.
Product width, height and depth are measured in inches, or centimeters for metric measurement. You can use a ruler to measure the item. Don't worry about being very accurate. A measurement to the nearest 1/8 of an inch should be fine. In real life, product dimensions will change slightly under different temperature and humidity conditions, or if compressed due to tight packing or stacking.
Here's a tip for doing a quick measurement of the item. If you are taking a photo of the product, then create a photo fixture that has a set of rulers for height and width. See the diagram below to see how this is constructed.
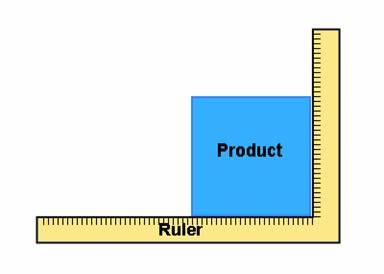
You can get a metal ruler like this at most hardware stores.
When you post-process the photo, you can easily see the measurements and then crop the ruler out of the final photo.
Section 2. Taking Photo Images
You can use almost any digital camera to take your product photo. Since we recommend the maximum size of a photo should be 400 pixels, any of today's digital cameras will more than do the job in terms of pixels. You do want as sharp an image as possible, so use the highest quality camera with the highest quality lens that you can.
In order to get the best looking photos, there are a few rules you need to follow:
1. Camera Position
Keep the camera at the same level as the product. The camera should be parallel to the face of the product. The idea is that you want the final product image to be rectangular so it fits the product rectangle on the plan.
Putting the product on a table is a good idea. Getting it up to eye level is even better. This lets you shoot directly head on without having to bend down to take the shot. When you look through the viewfinder, the product should look like a rectangle, not a trapezoid. The sides of the product should be straight up and down.
Make sure the top of the product is level with the top of the photo. A tilted product can be fixed in post processing but never looks very good once that's done. So keep the product level. You may need to do a test shot to really see if the camera is level with the surface on which the product is placed.
A tripod is a great idea since once you get the proper camera angle, you can lock it in so each shot is good.
2. Keep the Camera Steady
A tripod is a good idea for another reason. You want the photo as sharp as possible. Making sure the camera doesn't move is vital. And even with a high shutter speed, a tripod still produces superior sharpness.
And speaking of shutter speeds, you should use a high speed if possible. Since depth of field is not important, you can open up the f/stop and increase the shutter speed.
If you are not using a tripod, use at least 150th of a second.
3. Use a Telephoto Setting
Most digital cameras have zoom lenses. Shoot the product photos using the telephoto setting. This gives you a flatter, less distorted image.
With a telephoto setting you need a higher shutter speed or tripod to prevent the camera from shaking.
4. Use Even Flat Lighting
You want the amount of lighting to be even across the face of the product. If the product is lit from above, for example, the top of the product will look lighter than the bottom. It is hard to see this in the viewfinder, you have to view the finished image.
If you want to get fancy, you want diffused lighting coming from both sides. covering the lights with a diffuser or some sort of fireproof fabric will give you an even light.
If you know how to construct a light tent, this will give you very even lighting.
You can use the flash on your digital camera. Make sure that it doesn't product a bright spot on the front of the product. If you have a detachable flash, you could point it upwards to get softer bounce lighting.
5. Use a White Background
Shoot the product against a white background. This is so that when printing, any excess background won't be printed.
Section 3. Photo Post Processing
Your digital photos will need some post processing before they can be used. Most image editors can be used. You want the photos to look bright and snappy on the planogram. Keep in mind that each operation that changes the image reduces the quality of the image, so try to keep them to a minimum. At a very minimum, you are going to have to do most of the following:
Step 1. Crop the Photo
You will need to crop the photo to the edges of the product. There should be no space around the photo. This will also let you know how well you did when shooting. If you were level and the product came out as a rectangle, you will be able to tell that when cropping. It will result in no white space and no clipping of the product if it wasn't exactly rectangular.
Step 2. Size the Photo
For most purposes, your photo should be about 400 pixels as the longest side. If you want a very high resolution printout, then 600 to 800 pixels should be used.
Step 3. Adjusting Levels
A good photo has a dynamic range going from dark black to bright white. In many cases with digital cameras, particularly in indoor lighting, the dynamic range is compressed so that the whitest white is more like a light gray.
You can adjust the levels and expand the dynamic range so you get bright whites and dark blacks.
Using a program like Photoshop, you can adjust the levels manually or automatically. Try doing it automatically and see if you like the results. Sometimes an automatic leveling can create off-color results.
If you don't like the automatic leveling, do it manually. Here's what the levels look like in a photo with a good dynamic range.
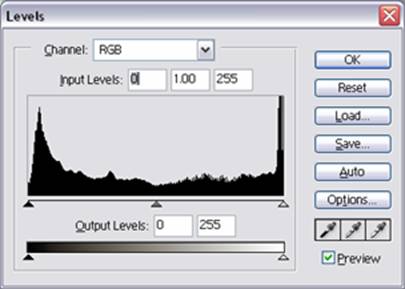
You can see the graph covers the back and white areas from one end of the graph to the other. Here's the graph of levels for a photo that is underexposed and doesn't have the proper levels of white.
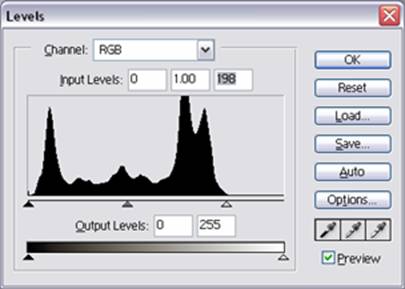
The graph shows that the white area of the photo (the right side of the graph) is lacking, giving you a photo that looks dark.
You can adjust this by clicking on the triangle under the graph on the right side. Then drag it to the left to the end of the graph area, as shown below:

Then click 'OK' and the dynamic range of the photo will be changed. In some cases, this produces a dramatic improvement of the photo.
The middle triangle can be dragged left or right to brighten or darken the photo.
Step 4. Sharpen the Photo
Many photos can use sharpening. This is also needed of you have reduced the image size. In Photoshop, you would use the unsharp mask feature. Sharpening will also bring out the lettering on the product label.
Once you have established a good setting for the sharpening, you can use it on the rest of the photos, if they have been shot with the same camera using the same setting.
Section 4. Importing the Product Database
Product information can be imported from an excel spreadsheet or another comma delimited file. The spreadsheet must be in a specific format, with the correct name and number of columns. You can even maintain your database in excel and then import it into the shelf logic database. Shelf Logic uses an Access2000 database, so you can put the data directly into it or hook into an ODBC compliant database to obtain your data.
Data is imported using the 'import' selection from the 'file' menu. This same data is exported using the 'export item file' selection from the 'file' menu.
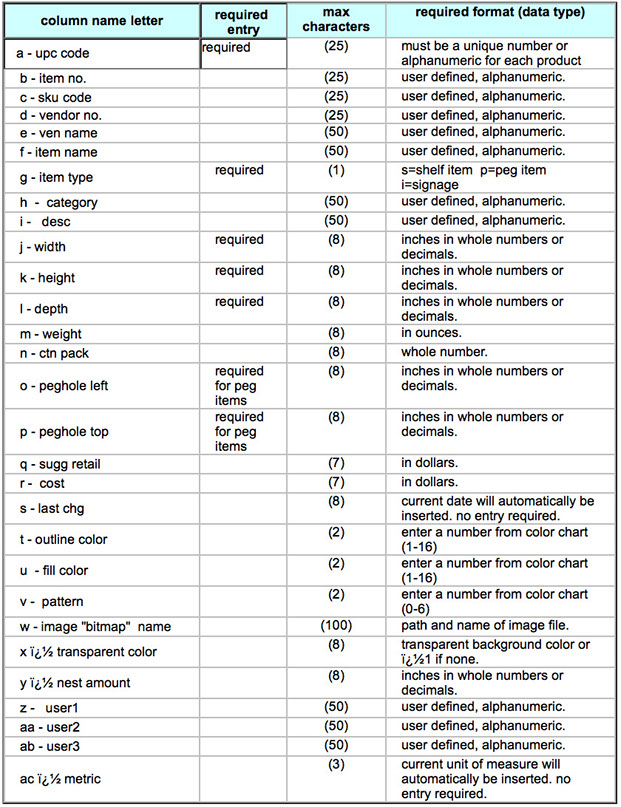
Spreadsheet Format
The easiest way to get the proper format for importing data is to use the template included with the program. It's called 'import template.csv' and is located in the 'c:\program files\shelf logic master edition' folder. You can open this up on excel.
The first row has the field names to guide you. Cut and paste your information column by column. The only information you really need is the UPC code (or some other unique number), and the product's height, width and depth. With this information, you can create planograms.
Note: One more important piece of information:
Any UPC codes with leading zeros must have an asterisk (*) in front of each one. This preserves the leading zeros during import.
Using Shelf Logic on a Network
This shows you how to set up your database and plan files for use on a shared drive.
Note: This article is for Master Edition and Enterprise Edition users.
The Shelf Logic program is network-able, letting multiple users share plans and databases. The program itself must be installed onto the local C: Drive, but the plan files and databases can reside on network shared drives.
Step 1. Setting up your Database
You will need to have your database on a shared drive. Databases have an extension of '.mdb'. You can either copy an existing database onto a shared drive or create a new database on the shared drive.
To create a new database on a shared drive, open the program and from the 'file' menu, select 'new database'. You can then enter the name and location of your new database. Make sure you create it on a shared drive.
Step 2. Setting the Default Database
Assuming you are going to use this shared database most of the time, it should be made the default database so that when the program first starts, this default database is the one used. You want to make your shared network database as the default so it is used when the program starts.
From the 'view' menu, select 'preferences'. Then click on the middle 'database' tab and you will see where the default database name goes. You need to enter the full path and database name. You can click the browse button to search for your database if you want. Then click OK and this becomes the new default database. The next time the program starts, this database will be used.
Step 3. Shared Plan Files
In order to share plan files, you only have to save the plan onto a shared drive. It will then be available to other users of the shared drive.
When you open a plan file, it opens the database from which it was created. If the plan file used a network database, that database will be opened for use.
Transferring Existing Plans to Network Drives
If you move your database to a network drive and there were plans created before the move, these plans will not find the database in the old location and will ask you for a new database. Just enter the path and name of the database you placed onto the network.
Setting the Shelf Logic Database
This tells you about the use of the default (or active) database for new plans.
For Enterprise Edition: The default database is assigned in preferences and will appear as the default when a new plan is created. The rest of this article applies to the master edition.
For Master Edition: Each time a Shelf Logic Master Edition database is used, it becomes the active database. This means that any new plans started will use this active database.
An active database is changed by using the 'file-open database' menu command to select a new database, which then becomes the new active database. An active database is also changed by opening a plan. The database used by the plan now becomes the active database. You can tell what database a plan is using by choosing the 'info' selection from the 'view' menu.
When Shelf Logic first starts, the default database (as defined in the preferences window) is opened and becomes the active database. If you create a new plan, this default database, which is the active database, is used for the new plan.
Multiple Databases
A plan file can only use one database, but you can have as many databases as you want. Just make sure you have the correct database opened when you start your new plan. You can tell which database you are using by viewing the product (item maintenance) window. The caption bar will tell you the active database.
Let's take an example of using multiple databases.
Shelf Logic starts and database 'A' is the default database defined in preferences. Database 'A' becomes the active database. Any plans created now will use database 'A'.
Now you open up a plan that uses database 'B'. Database 'B' is now the active database. Any plans created now will use database 'B'.
You use the 'file-open database' menu command to select database 'C'. This becomes the active database. Any plans created now will use database 'C'.
You end the program and then start Shelf Logic again. Database 'A', which is the default database, now becomes the active database.
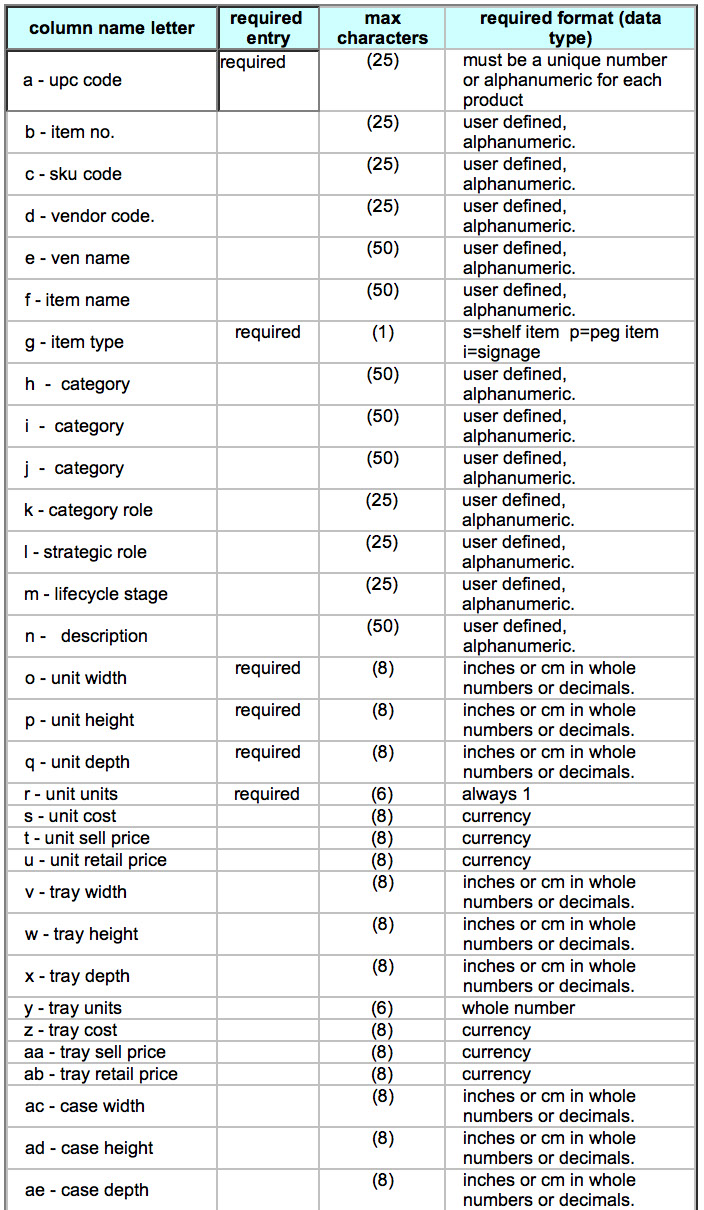
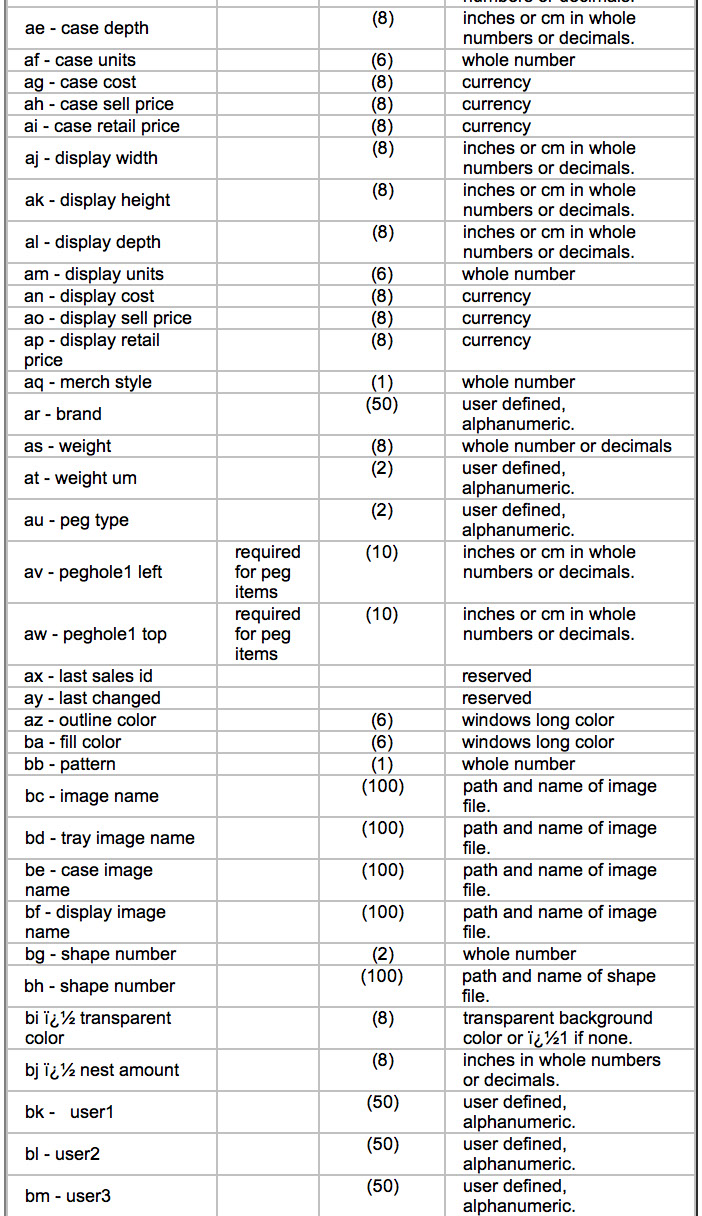
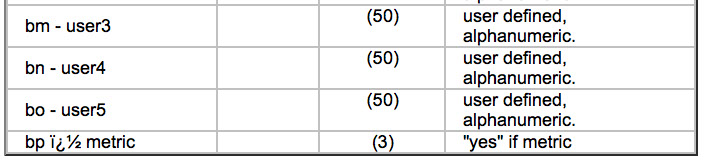
Database Layout
This is a chart with with the layout of the Shelf Logic Access2000 database.
Master Edition Database Layout
Enterprise Edition Database Layout
Importing from Excel
Product information can be imported from an excel spreadsheet or other comma delimited file. The spreadsheet must be in a specific format, with the correct name and number of columns. You can even maintain your database in excel and then import it into the Shelf Logic database. Data is imported using the 'import' selection from the 'file' menu. Spreadsheet format is the easiest way to get the proper format for importing data to use the template included with the program. The first row has the field names to guide you. Just cut and paste your information column by column. The only information you really need is the UPC code (or some other unique number), and the product's height, width and depth. With this information, you can create planograms. One more important piece of information: any UPC codes with leading zeros must have an asterisk (*) in front of each one. This preserves the leading zeros.
Import Template for Master Edition
A .csv file you can use for importing items into Master Edition. Open it in Excel and fill in the appropriate information, then save it as a .csv file and import into Shelf Logic.
When importing from Excel, you must have the information in the proper column order. The Excel file to be imported must also be saved as a comma delimited file, which is saved with a .csv extension.
Ee have included a blank Excel .csv file into which you can put your data to be imported. It is suggested that you cut and paste your data column by column into this template.
Be sure to save this completed template under a different name so this original blank template is preserved.
For more information about how to populate the import template, click here.
There is a copy of this import template in your Shelf Logic Master Edition folder. it is called "import_template.csv".
Or you can download this import_template.csv file here.
Import Template for Enterprise Edition
A .csv file you can use for importing items into Enterprise Edition. Open it in Excel and fill in the appropriate information, then save it as a .csv file and import into Shelf Logic.
When importing from Excel, you must have the information in the proper column order. The Excel file to be imported must also be saved as a comma delimited file, which is saved with a .csv extension.
Ee have included a blank Excel .csv file into which you can put your data to be imported. It is suggested that you cut and paste your data column by column into this template.
Be sure to save this completed template under a different name so this original blank template is preserved.
For more information about how to populate the import template, click here.
There is a copy of this import template in your Shelf Logic Master Edition folder. it is called "import_template_ee.csv".
Or you can download this import_template.csv file here.
Sample Exported Database
This is an export of the sample database.
When you export the Shelf Logic database, it creates an Excel compatible comma delimited file, with a csv extension.
For Master Edition:
Here is the sample database exported into a csv file.
For Enterprise Edition:
Here is the sample database exported into a csv file.
Note: This exported database is in the exact same format as the import template. You can export a file and, without changing it in any way, import it again.
Speeding up your Display
1. Turn off the display of pegholes and your screen will refresh faster. You can turn on the pegholes before printing if you the pegholes to appear in the printout. Turn off the pegholes from the "View" menu, the "Show Pegholes" selection. Or you can enter CONTROL-H to turn the pegholes on and off.
2. Turn off the display of photo images and your screen will refresh faster. You can turn the photo images on later. From the "View" menu, use the "Show Photos" selection. Or enter CONTROL-T to turn the display of photo images on and off.
3. Use photos of recommended size of 400 pixels.
4. Use our Batch Resize program to create thumbnails for fast screen refresh. Your regular photos will be used when printing your plan.
5. Keep photos on a fast drive, not a network drive or on a CD. If you need to keep photos on a network drive, use Batch Resize to generate thumbnails on your local drive.
Improving the Look of your Display
1. After you are finished, select all items on a shelf and use the Align Bottom command to line up the bottoms of all items so they sit perfectly on the shelf. The Align Bottom command is found on the "Item" menu, then select "Align", then choose "Bottom".
For peg items, you can use the Align Top command. Select the items in one peg row, then use the "Item" menu, select "Align", then choose "Top".
Super Fast Item/Shelf Duplication
1. By holding down the CONTROL key while you drag one or more faces and/or shelves, duplicates will be created. The faces/shelves will drag as normal but when you release the mouse button after the drag, the original faces/shelves are still there, and the dragged faces/shelves will be duplicates.
2. For displays with sections withe similar shelves, create the shelves in the first section and select all these shelves. Hold down the CONTROL key and drag the shelves sideways into the next section. You will have duplicated all shelves in the first to the second section.
Cut and Paste from One Plan to Another
1. The cut & paste command can be used not only to duplicate or move faces within a plan, but you can copy or move faces to other plans. This applies to shelves and signage as well as faces. When faces/shelves/signs are cut or copied, they are stored in a special buffer on disk that remains there until other faces/shelves are copied or cut. These remain in the buffer even if Shelf Logic is exited and your computer turned off. So you can use faces/shelves in the buffer days or weeks later.
2. To paste faces/shelves/signs from one plan to another, open the first plan and select one or more faces/shelves/signs. Then use the cut or copy command. Then open the second plan. You then use the paste command and the faces/shelves/signs selected will appear in the upper left corner of your plan. You can then drag them into the proper place.
Renaming the User Fields
1. The Master Edition database comes with 3 'Users' fields that you can use to store information specific to your company. Your can rename these fields to suit your purposes. From the "View" menu, select "Change Field Labels". You will see the current field names for not only the 3 user fields, but all fields. You can change all of these field names if you wish. Just enter the new field name for each field.
These new field names are used throughout the program, on screen, in Item Maintenance, on reports and on exports.
Items on Shelves not Reporting Correctly
1. (For Peg/Shelf combination displays) When an item is dragged onto a shelf, it is assigned to that shelf. On reports, the item appears on that shelf. But if the shelf height is less than an item on the shelf, then the top of the item is a peg area. So if you put a 12" high item on a 10" shelf, 2" sticks into a peg area above the shelf. So the program thinks that this is a peg item hanging in a shelf area and the item facing is now considered as a peg item. So when you run reports, these items are missing from the shelf.
You can tell if an item is assigned to a shelf by selecting it and looking at the Status Line at the bottom of the Shelf Logic screen. You will see a shelf number assigned. If you see a peg hook length, then it's considered a peg item.
To remedy this:
a. Make the shelf height large enough to fit the height of the highest item on the shelf. If the item.
b. If the shelf height is large enough, then select the facing, drag it upwards slightly and then drag it back down and let the facing snap to the shelf. It should be properly assigned to that shelf.
Changing the Database Location
Once a plan is created, the database used for it should not be moved. Within each plan file is a link to the database. It's simply the path name and database name of the database file used by this plan.
If you have to move the database, do the following, the next time a plan is opened, it will tell you the database is missing and ask you for a new database. Indicate the newly moved database. Make sure to save the plan so the new database name is saved.
PRODUCTS
SERVICES
RESOURCES
COMPANY
CONNECT
How to Order